How to Tie a Mandala on a T-Shirt: Step-by-Step Guide
A mandala is one of the most striking designs you can create with tie-dye. Its repeating folds create a symmetrical pattern that radiates outward from a central point, producing everything from simple starbursts to highly detailed flower-like designs.
For this project, we’re using textile reactive dyes on a 100% cotton T-shirt. Fiber-reactive dyes are an excellent choice for cotton because, when used according to the manufacturer’s instructions, they chemically bond with cellulose fibers to create bright, durable color.
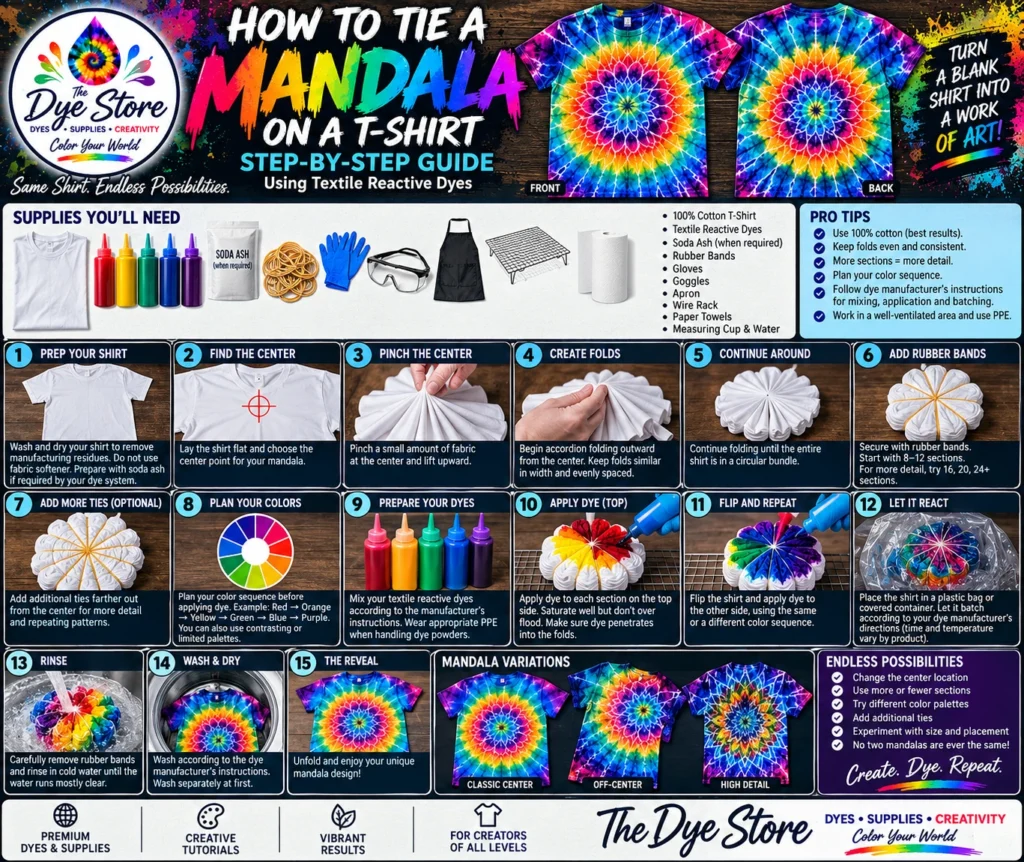
What You’ll Need
- White 100% cotton T-shirt
- Textile/fiber-reactive dyes
- Soda ash, if required by your dye system
- Rubber bands or strong tying string
- Squeeze bottles
- Gloves
- Protective goggles
- Protective apron
- Plastic-covered work surface
- Wire rack or suitable dyeing surface
- Plastic bag or covered container for batching
- Water and paper towels
Step 1: Prepare Your T-Shirt
Wash the shirt first to remove manufacturing residues, finishes or oils that could interfere with even dye penetration. Avoid fabric softener. Prepare the shirt according to the instructions supplied with your fiber-reactive dye system. If your process calls for a soda-ash presoak, use it according to the manufacturer’s directions. Wring or spin out excess liquid so the shirt is damp rather than dripping wet.
Steps 2–7: Find the Center, Fold and Tie
Lay the shirt flat and choose the point where you want the mandala to begin. For a traditional centered design, use a point near the middle of the chest. Pinch a small amount of fabric at that center point and lift upward, then begin accordion-folding outward from the center.
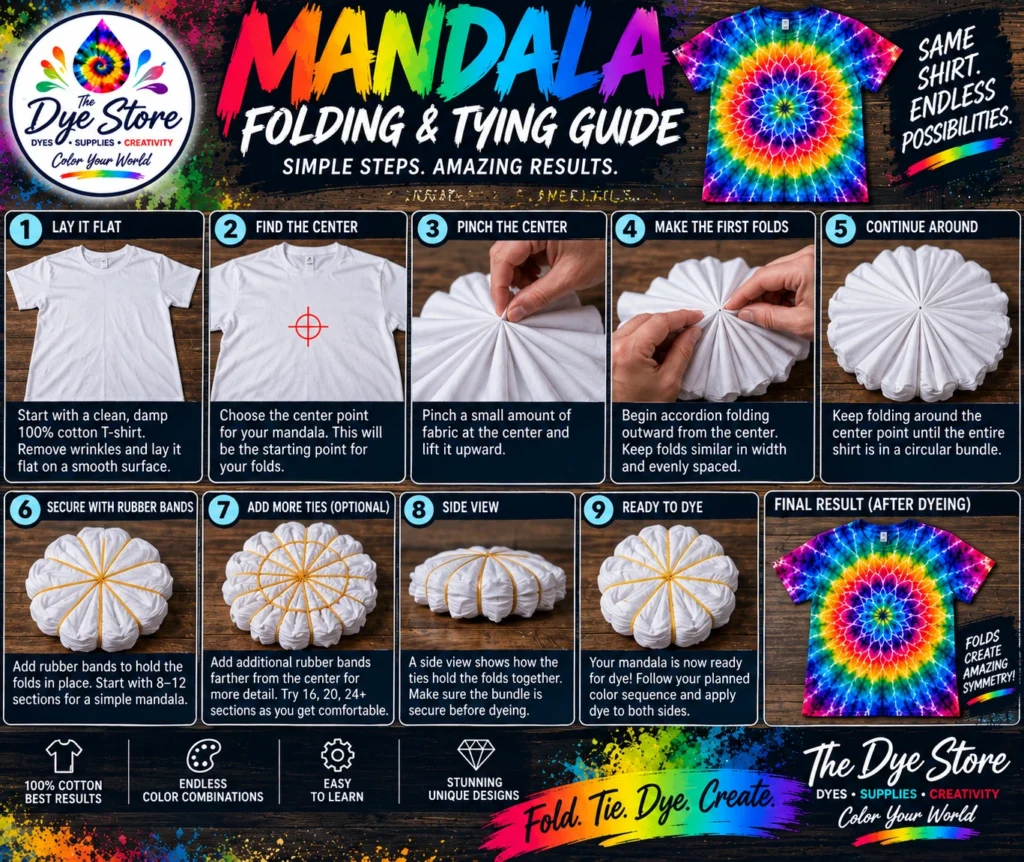
Keep the folds similar in width and evenly spaced as you work around the center. Once the entire shirt forms a compact circular bundle, secure it with rubber bands or string. Start with roughly 8–12 sections for a simpler mandala, or add more sections for greater detail. Additional ties farther from the center can create even more repeating boundaries and pattern complexity.
Step 8: Plan Your Colors
Decide your color order before you start applying dye. A rainbow sequence such as Red → Orange → Yellow → Green → Blue → Purple works well, but limited palettes and alternating contrasts can be just as effective. Planning first helps reduce accidental muddy areas and makes symmetry easier to maintain.
Step 9: Prepare Your Textile Reactive Dyes
Put on appropriate PPE before handling dye powders or concentrated solutions. Prepare each dye according to the manufacturer’s directions. When working with powders, minimize airborne dust, use good ventilation and use appropriate respiratory protection when called for by the product instructions, SDS or working conditions.
Steps 10–11: Apply Dye to the Top and Flip
Place the tied bundle on a protected work surface or rack. Apply dye section by section, beginning near the center. Work carefully enough to get dye into the folds without unnecessarily flooding the entire bundle. Once the first side is complete, flip the shirt and repeat the sequence on the back. For strong symmetry, place corresponding colors opposite the colors used on the first side.
Step 12: Let the Dye React
Place the dyed shirt in a suitable covered container or otherwise batch it according to the instructions for your particular fiber-reactive dye system. Temperature, dye chemistry, moisture and time all matter, so follow the manufacturer’s directions rather than assuming one universal batching period.
Steps 13–15: Rinse, Wash and Reveal
After the recommended reaction period, carefully remove the ties and slowly unfold the shirt. Follow the dye manufacturer’s recommended rinse and wash procedure, continuing until excess color has been appropriately removed. Wash newly dyed garments separately from other clothing during initial washes when appropriate.
How to Get a More Detailed Mandala
More folds create more opportunities for detail. Smaller, carefully controlled folds can produce intricate repeating shapes. Additional ties can introduce more boundaries, while careful color repetition can strengthen the visual symmetry. Once you understand the basic technique, try moving the center, changing section counts and experimenting with different color palettes.
Common Mandala Tie-Dye Problems
- The pattern isn’t symmetrical: the folds or sections were probably uneven.
- Large white areas: dye may not have penetrated deeply enough into the folded bundle.
- Muddy colors: too much dye may have crossed between neighboring sections, or adjacent colors may have mixed.
- The center is off: the initial pinch point determines the center of the finished design.
- Colors aren’t vibrant: check fabric composition, dye preparation, soda-ash requirements and batching conditions.
Pro Tip: Cotton Matters
Fiber-reactive dyes are particularly well suited to cellulose fibers such as cotton. That’s why we recommend a quality 100% ringspun cotton T-shirt for this project. Ringspun cotton also provides a soft, comfortable garment that makes an excellent canvas for detailed tie-dye work.
Same shirt. Endless possibilities.
Shop the Supplies for This Tutorial
Continue Learning
Important Safety Note
Always read and follow the manufacturer’s instructions, product label and applicable Safety Data Sheet for the dyes and auxiliary chemicals you’re using. Work in an appropriately ventilated area and use protective equipment appropriate for the material and task.
Dye powders and related chemical products are not for human or animal consumption.