Hot Bath Dyeing vs. Cold Dyeing: What’s the Difference?
Hot bath dyeing and cold dyeing can both produce beautiful color, but they rely on different chemistry, temperatures, fibers, and dye classes. Choosing the right method helps you get stronger color, better washfastness, and more predictable results.
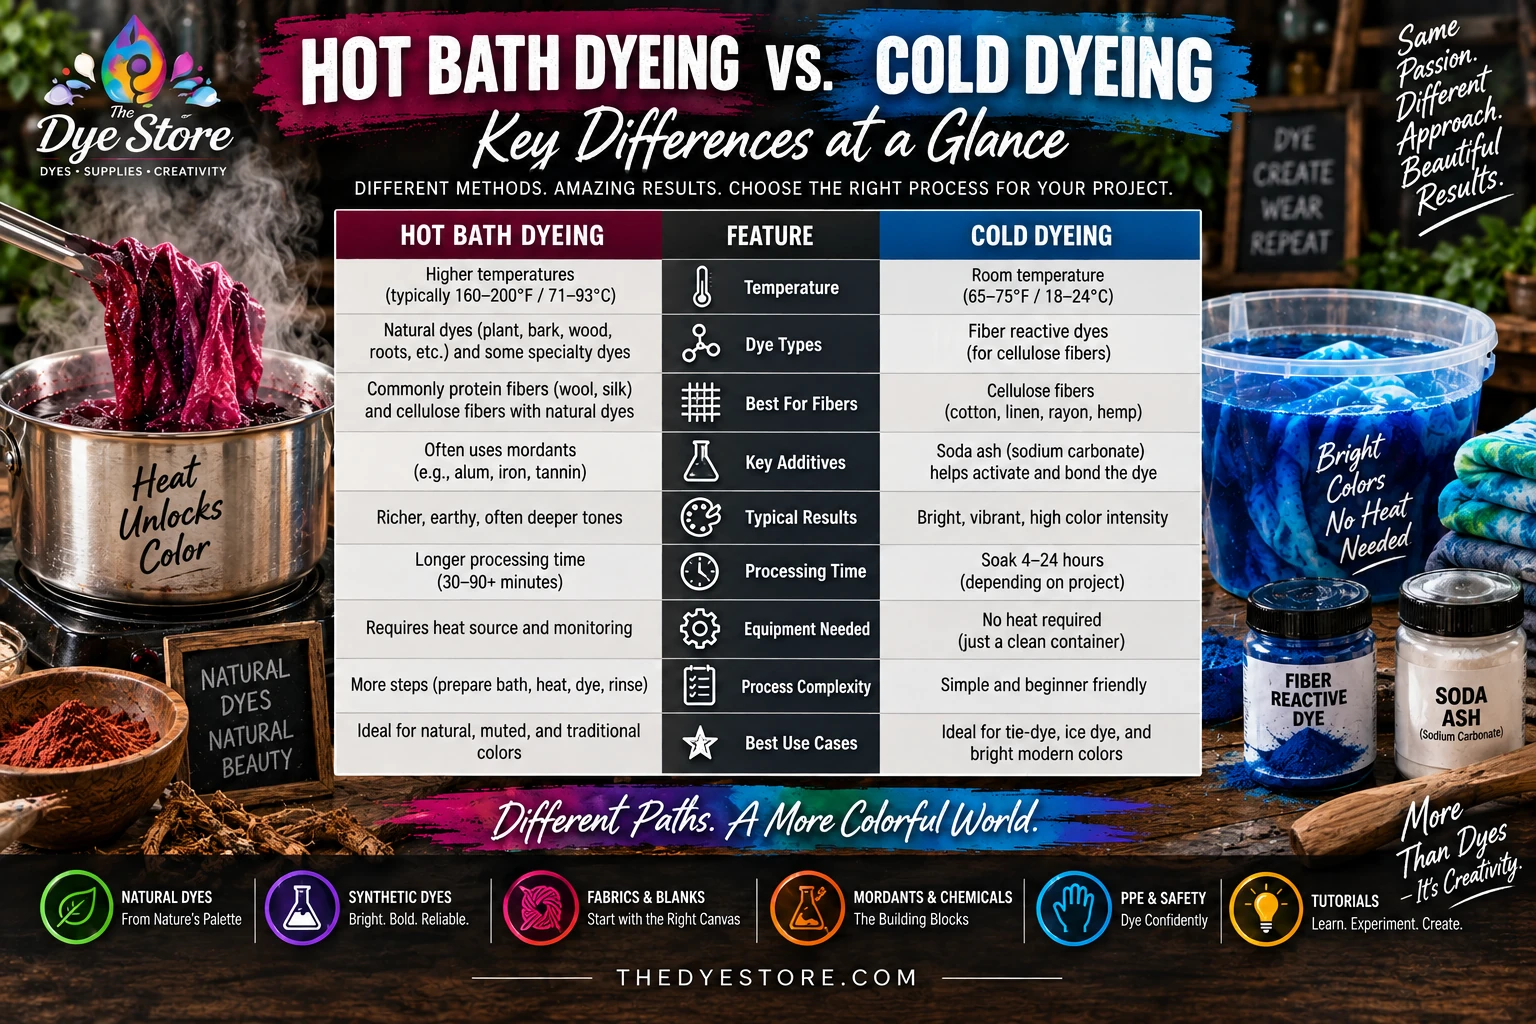
Hot Bath Dyeing vs. Cold Dyeing at a Glance
| Method | Best suited for | Typical temperature | Main advantage |
|---|---|---|---|
| Hot bath dyeing | Many natural dyes, acid dyes, some direct dyes | Warm to simmering, depending on dye and fiber | Heat helps extraction, penetration, and fixation |
| Cold dyeing | Many fiber-reactive processes on cellulose fibers | Room temperature to warm | Excellent color with less heat and easy batch methods |
What Is Hot Bath Dyeing?
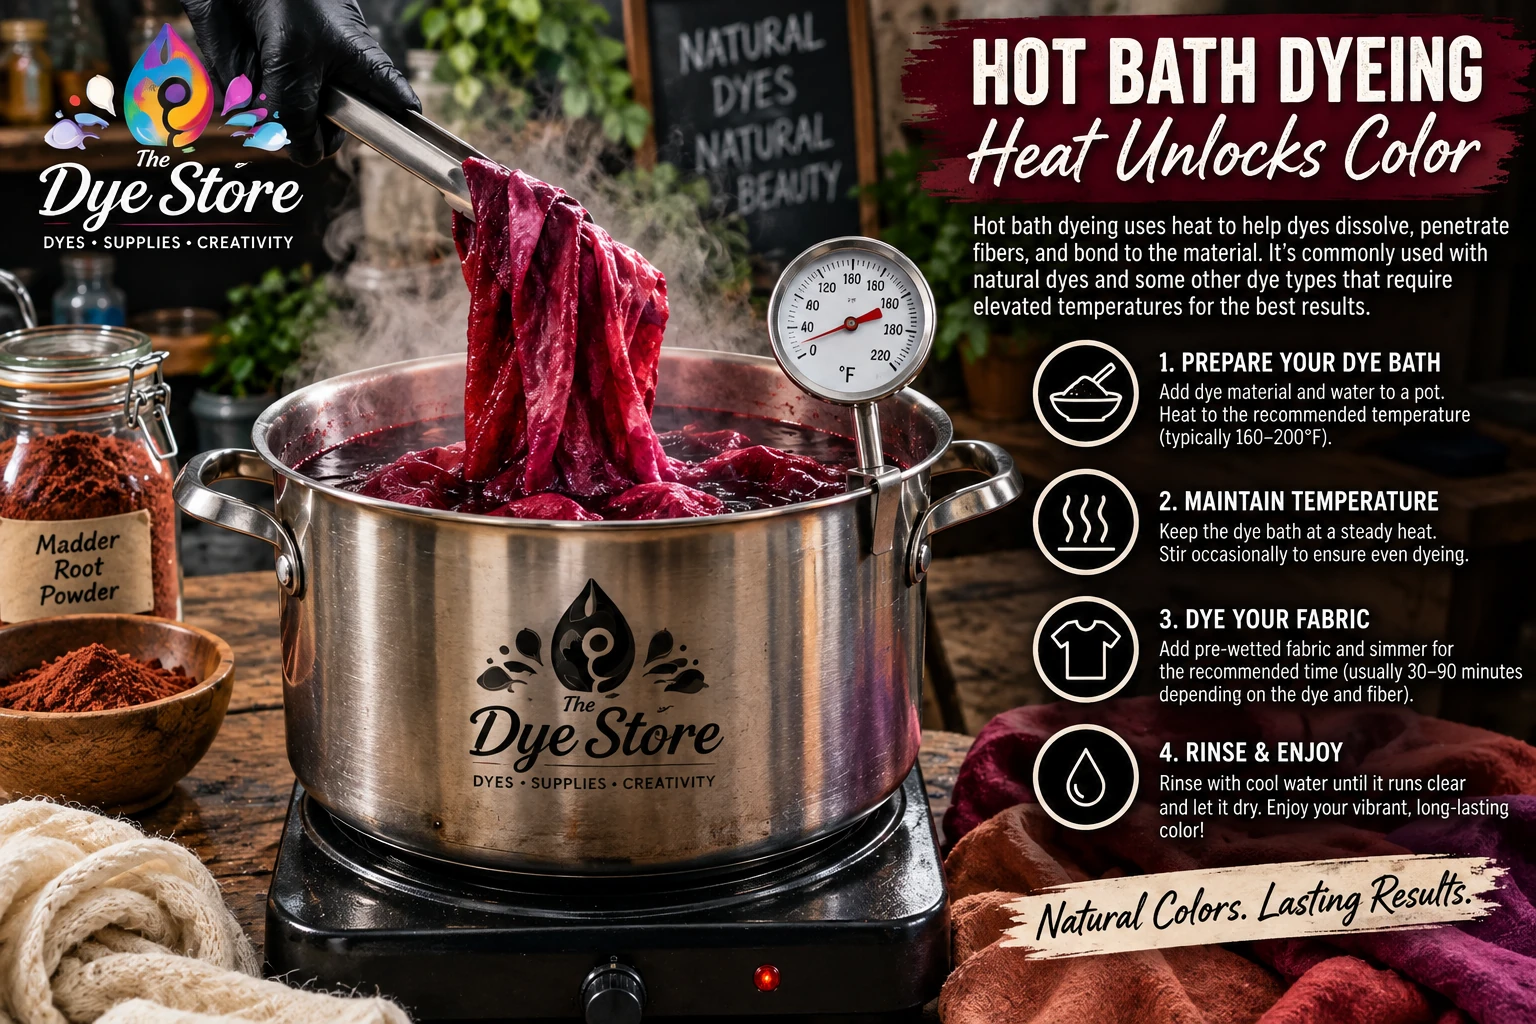
Hot bath dyeing uses a heated dye bath to help move color into the fiber and, depending on the dye system, support extraction and fixation. It is especially common with many natural dyes and with dye classes that are designed to work on protein fibers such as wool and silk.
In natural dyeing, heat can help pull color compounds from plant material and encourage more even contact between the dissolved color and the textile. Mordants may also be used depending on the dye and fiber. Always follow the instructions for the specific natural dye and mordant you are using.
Advantages of hot bath dyeing
- Useful for many natural-dye processes.
- Heat can improve extraction and penetration.
- Good control over immersion dyeing and even color.
- Works well with dye systems designed for heated baths.
Things to watch for
- Too much heat can damage some fibers.
- Rapid heating or agitation can felt wool.
- Some colors shift when overheated.
- You need heat-safe equipment reserved for dye work.
What Is Cold Dyeing?
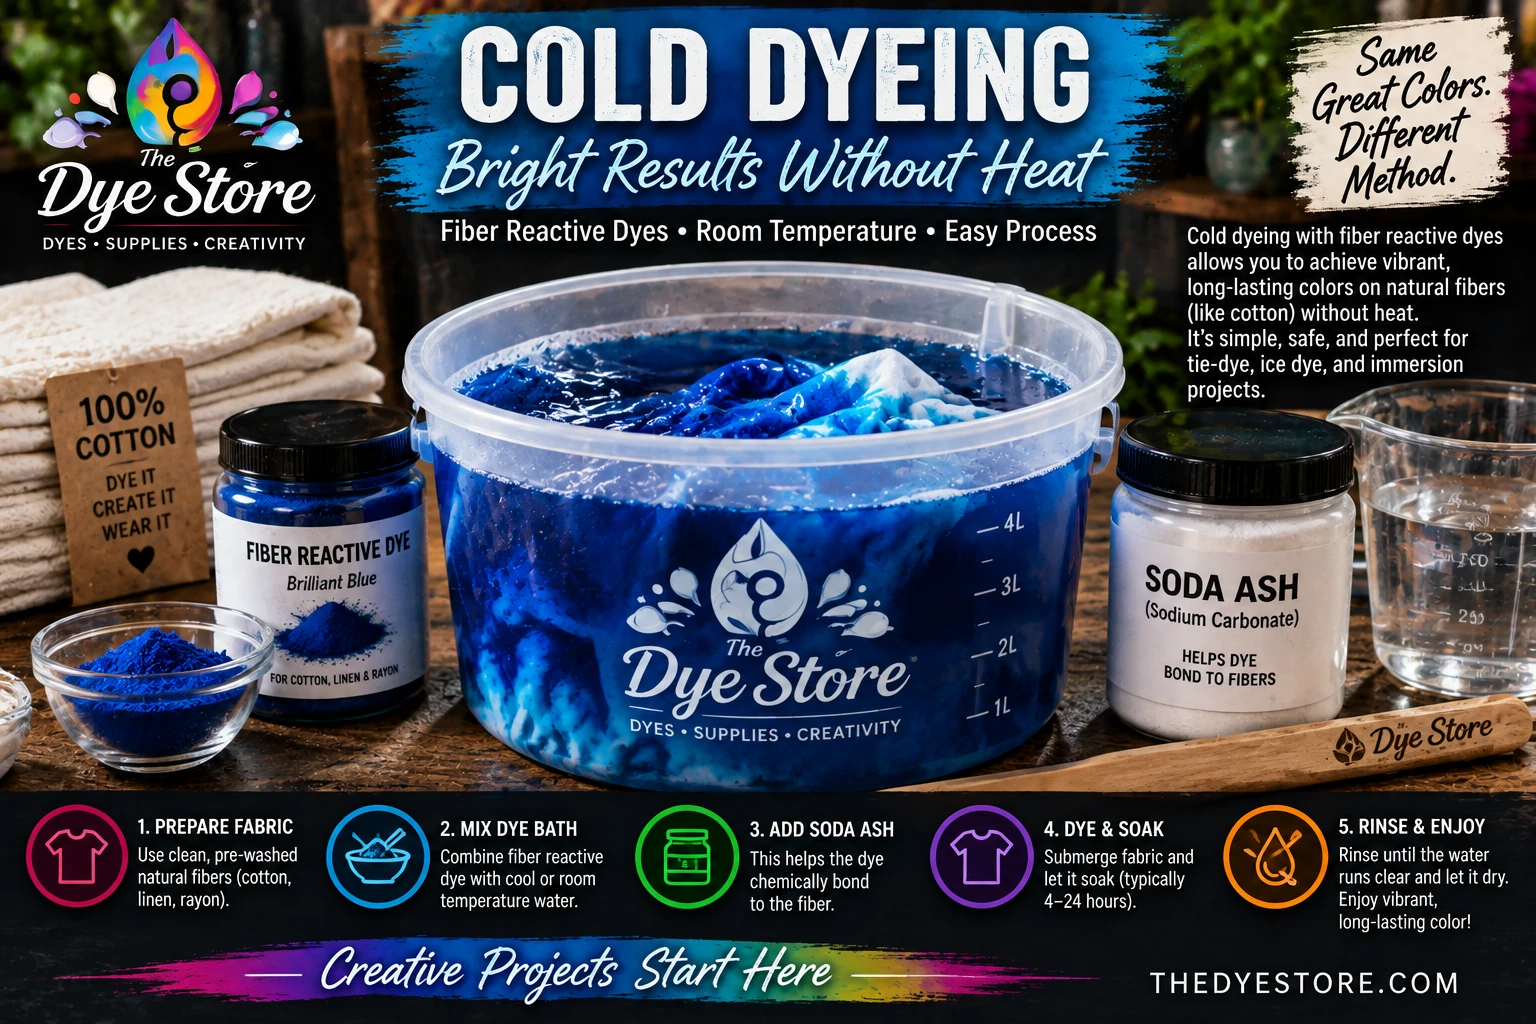
Cold dyeing generally refers to dye processes that do not require a hot simmering bath. Many fiber-reactive dyes are designed to form a strong chemical bond with cellulose fibers such as cotton, rayon, and linen under alkaline conditions. Soda ash is commonly used to create the alkaline environment needed for fixation.
“Cold” does not always mean icy water. Most fiber-reactive dyes perform best within a suitable room-temperature or warm range, and very cold conditions can slow the reaction. Always follow the recommended temperature range for the specific dye.
Advantages of cold dyeing
- Excellent choice for cotton and other cellulose fibers with fiber-reactive dyes.
- Uses less energy than a heated bath.
- Well suited to tie-dye, ice-dye, low-water immersion, and batch methods.
- Can produce very bright, saturated colors.
Things to watch for
- Temperature that is too low can slow fixation.
- Incorrect soda-ash concentration can reduce color yield.
- Different fiber-reactive colors can have different temperature preferences.
- Rinsing and washing are important for removing unfixed dye.
Which Method Should You Choose?
The best method depends first on the fiber and the dye class—not simply on whether you prefer to work hot or cold.
- Cotton, rayon, linen: fiber-reactive dyes are a strong choice for room-temperature or warm batch dyeing.
- Wool and silk: many acid-dye systems use controlled heat, while natural-dye methods often use warm or heated baths.
- Natural dyes: many recipes use heat for extraction and dyeing, although exact temperatures vary by plant material and fiber.
- Tie-dye and ice-dye projects: fiber-reactive dyeing is usually the most practical approach for cellulose fabrics.
Simple Hot Bath Workflow
- Identify your fiber and choose a compatible dye.
- Pre-wash the fabric to remove finishes and oils.
- Prepare any mordant or pretreatment required by the dye system.
- Prepare the dye bath according to the product instructions.
- Wet the fabric thoroughly before adding it to the bath.
- Raise the temperature gradually and maintain the recommended range.
- Move the fabric gently for even coverage.
- Allow the fabric to cool before rinsing when appropriate.
- Rinse and wash according to the dye instructions.
Simple Cold Fiber-Reactive Workflow
- Start with clean cotton, rayon, linen, or another compatible cellulose fiber.
- Prepare the fiber-reactive dye according to the manufacturer’s directions.
- Apply or immerse the dye using your chosen technique.
- Use soda ash according to the dyeing method so the dye can bond with the fiber.
- Keep the project within the recommended temperature range while it batches.
- Give the dye enough time to react before rinsing.
- Rinse progressively until excess dye is removed, then wash thoroughly.
Can You Use the Same Dye for Both Methods?
Sometimes, but not always. Dye classes are formulated for specific fibers and chemical conditions. A dye designed for cellulose fibers may not behave correctly on wool, and a dye intended for protein fibers may require heat and an acidic bath. The most important step is matching the dye class to the fiber.
Common Mistakes
- Choosing the dye before identifying the fiber.
- Assuming hotter always means better color.
- Using water that is too cold for efficient fiber-reactive fixation.
- Skipping scouring or pre-washing.
- Using the wrong mordant, alkali, acid, or concentration.
- Rushing the rinse and washout stage.
Safety
Wear appropriate gloves and eye protection, avoid breathing dye powders, and work in a well-ventilated area. Use dedicated dyeing utensils and containers rather than cookware intended for food. Follow the safety information supplied with each dye, mordant, and auxiliary chemical.
Explore our natural dyes, fiber-reactive dyes, mordants, and PPE & safety supplies for your next project.
Frequently Asked Questions
Does hot water make every dye work better?
No. Some dye systems need heat, while others are designed for room-temperature or warm fixation. Excessive heat can reduce control or damage certain fibers.
Is cold dyeing really cold?
Not necessarily. In many cases it means no heated dye bath. Room-temperature or mildly warm conditions are common.
Which method is best for cotton?
Fiber-reactive dyeing is one of the most effective methods for cotton because the dye can chemically bond with cellulose under alkaline conditions.
Which method is best for natural dyes?
Many natural-dye recipes use a heated bath, but temperature requirements vary widely by dye source, mordant, and fiber.
Not for human or animal consumption.
Hot Bath Dyeing vs. Cold Dyeing: What’s the Difference?
Hot-bath dyeing and cold dyeing can both produce beautiful color, but they are not interchangeable techniques. The right temperature depends on the fiber, dye class and chemistry you are using. Understanding that relationship helps you choose a process that gives better color, more predictable fixation and less wasted dye.
In this guide, “cold dyeing” means dyeing at room temperature or warm temperatures without maintaining a heated dye bath. Always follow the directions for your specific dye, mordant and fabric rather than assuming every dye behaves the same way.
Hot Bath vs. Cold Dyeing at a Glance
| Method | Hot Bath Dyeing | Cold Dyeing |
|---|---|---|
| Temperature | Uses a deliberately heated dye bath | Usually room temperature to warm, depending on the dye |
| Common uses | Many natural-dye processes and dye systems that require heat | Many fiber-reactive applications on cellulose fibers, including tie-dye |
| Process control | Requires temperature monitoring and heat-safe equipment | Often simpler to set up, but temperature still affects reaction speed |
| Best choice | When the selected dye recipe calls for heat | When the selected dye chemistry fixes effectively without a heated bath |
What Is Hot Bath Dyeing?
Hot-bath dyeing keeps the textile in a heated liquid dye bath for part or all of the coloring process. Heat can help extract color from some natural dye materials, increase movement of dye through the bath and assist dye uptake or fixation in dye systems designed to work at elevated temperatures.
The important point is that hotter is not automatically better. Excessive heat can damage some fibers, shift natural-dye colors or work against dye chemistries intended for lower temperatures. Use the temperature range specified by the dye or recipe.
Why Natural Dyeing Often Uses Heat
Many natural-dye recipes involve heat during extraction, dyeing or both. Plant material may be simmered or otherwise heated to move color-producing compounds into water before the prepared textile is introduced. Depending on the dye and fiber, a mordant may also be part of the process.
Natural dyes vary widely, so there is no universal temperature or mordant. Some colorants are sensitive to excessive heat, while others benefit from a controlled heated bath. Treat each botanical dye as its own process.
What Is Cold Dyeing?
Cold dyeing avoids maintaining a hot dye pot. In practice, many so-called cold processes actually work at room temperature or moderately warm temperatures rather than literally cold water. This is especially important with fiber-reactive dyes: reaction rate depends on temperature, and a workspace that is too cold can slow fixation.
Fiber-Reactive Dyes and Lower-Temperature Dyeing
Fiber-reactive dyes are popular for cotton and other cellulose fibers because the dye can form a strong chemical bond with the fiber under appropriate conditions. Many tie-dye and immersion processes use soda ash to create the alkaline conditions needed for fixation rather than relying on a continuously heated dye bath.
That does not mean temperature is irrelevant. The ideal working range depends on the particular reactive dye, and cooler conditions may require more time or a different procedure. Follow the instructions supplied for the dye you are using.
The Fiber Matters as Much as the Dye
Start by identifying the textile. Cotton, linen, rayon, wool, silk and synthetic fibers do not all accept the same dyes or tolerate the same processing conditions. A method that performs beautifully on a 100% cotton shirt may be unsuitable for wool or polyester.
For many fiber-reactive projects, clean cellulose fabric such as cotton is an excellent starting point. Natural-dye methods can be used with several fiber families, but preparation and mordanting requirements may differ substantially.
When to Choose a Hot Bath
- Your dye or natural-dye recipe specifically calls for sustained heat.
- You are extracting color from botanical material using a heated extraction method.
- The selected dye class and fiber require elevated temperature for effective uptake or fixation.
- You can safely control temperature with dedicated, heat-safe dyeing equipment.
When to Choose a Cold or Lower-Temperature Process
- You are using a fiber-reactive dye process designed for cellulose fibers at room or warm temperatures.
- You are tie-dyeing, batching or using another application where a heated immersion bath is unnecessary.
- The dye manufacturer’s instructions specify lower-temperature processing.
- You want a process that does not require maintaining a dye pot on a heat source.
Example Hot-Bath Workflow
- Identify the fiber and choose a compatible dye.
- Prewash the textile to remove finishes, oils and residues.
- Prepare or mordant the textile when the specific recipe requires it.
- Prepare the dye bath according to the dye instructions.
- Bring the bath to the recommended temperature gradually.
- Add the textile and move it as directed to encourage even coloration.
- Maintain the specified time and temperature.
- Cool, rinse and wash according to the dye instructions.
Example Cold-Dye Workflow for Fiber-Reactive Dye
- Choose a cellulose textile such as 100% cotton and prewash it.
- Prepare the fabric and soda-ash step according to your dye instructions.
- Dissolve and apply the fiber-reactive dye using the recommended water temperature and concentration.
- Keep the project within the recommended temperature range while the dye reacts with the fiber.
- Allow the recommended batching or reaction time.
- Rinse away excess dye, then wash according to the dye manufacturer’s directions.
Common Mistakes to Avoid
- Assuming every dye needs heat. Some dye systems are specifically designed to work without a hot bath.
- Assuming “cold” means temperature does not matter. Very cool conditions can change reaction rates.
- Using the wrong dye for the fiber. Match the dye chemistry to the textile before choosing the process.
- Skipping preparation. Fabric finishes, oils and residues can interfere with even dyeing.
- Using a mordant or soda ash interchangeably. They serve different purposes in different dye systems.
- Ignoring the manufacturer’s instructions. Dye classes and individual colors can have different requirements.
Is Hot Dyeing Better Than Cold Dyeing?
Neither method is inherently better. The better process is the one appropriate for the dye and fiber you selected. Hot-bath dyeing can be essential for certain natural-dye and other dye systems, while lower-temperature fiber-reactive processes are extremely useful for cotton tie-dye and related techniques.
Safety Around Hot and Cold Dye Processes
Both methods require sensible handling. Avoid breathing airborne dye powders, use gloves and appropriate eye protection, maintain good ventilation, and follow product labels and Safety Data Sheets. Hot baths add burn and scald hazards, so use stable heat-safe equipment and handle hot liquids carefully. Keep dyeing equipment separate from food preparation.
Shop the Supplies for Your Next Dye Project
Continue Learning
Frequently Asked Questions
Does fiber-reactive dye need a hot dye bath?
Many fiber-reactive processes for cellulose fibers do not require a continuously heated bath. They rely on the correct chemistry, including appropriate alkalinity, temperature and reaction time. Follow the instructions for the specific dye.
Do natural dyes always need heat?
No. Natural dyes are a broad group, and extraction and application methods vary. Many traditional processes use heat, but the correct method depends on the particular colorant and fiber.
Can I use cold water for tie-dye?
Many fiber-reactive tie-dye processes work without a hot bath, but water and ambient temperature still affect the process. Use the temperature range and batching time recommended for your dye.
What is the biggest difference between the two methods?
A hot bath deliberately uses sustained heat as part of the dyeing process. Cold or lower-temperature dyeing relies on a dye system that can develop and fix effectively without maintaining that heated bath.
Important Safety Note
Always follow the dye, mordant and auxiliary manufacturer’s instructions and applicable Safety Data Sheets. Use suitable PPE and ventilation for the materials and process you are using.
Dye powders and related chemical products are not for human or animal consumption.
How to Tie a Mandala on a T-Shirt: Step-by-Step Guide
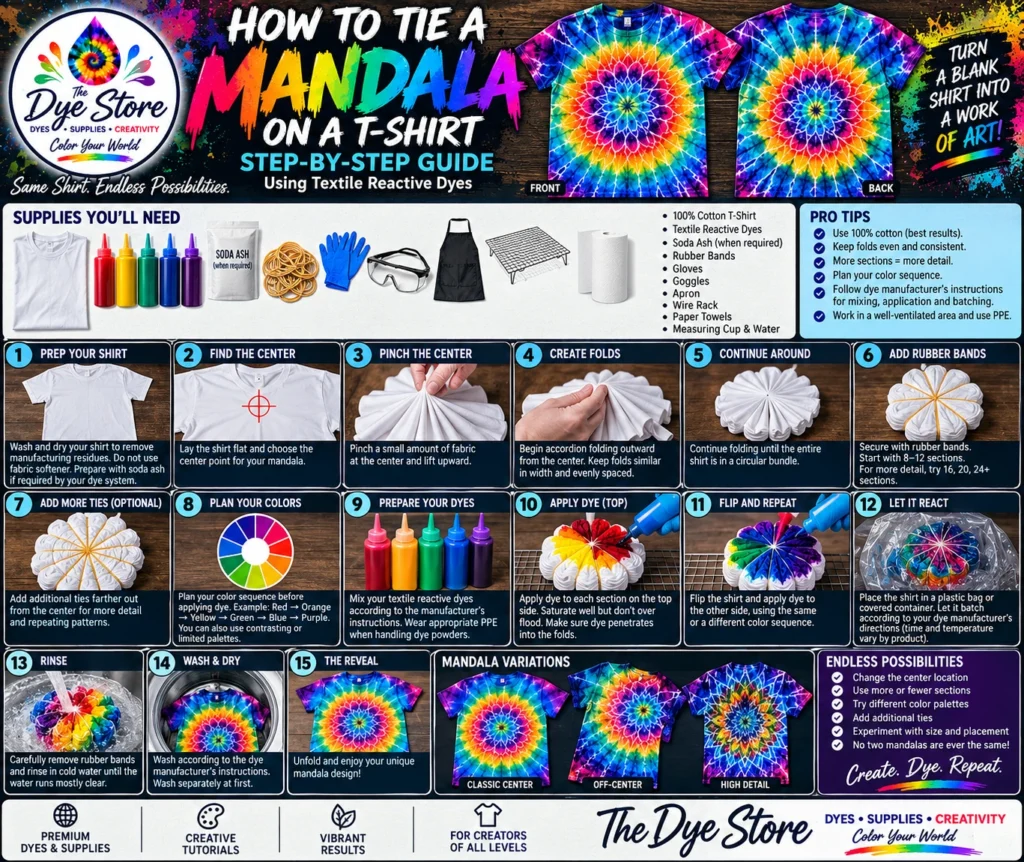
A mandala is one of the most striking designs you can create with tie-dye. Its repeating folds create a symmetrical pattern that radiates outward from a central point, producing everything from simple starbursts to highly detailed flower-like designs.
For this project, we’re using textile reactive dyes on a 100% cotton T-shirt. Fiber-reactive dyes are an excellent choice for cotton because, when used according to the manufacturer’s instructions, they chemically bond with cellulose fibers to create bright, durable color.
What You’ll Need
- White 100% cotton T-shirt
- Textile/fiber-reactive dyes
- Soda ash, if required by your dye system
- Rubber bands or strong tying string
- Squeeze bottles
- Gloves
- Protective goggles
- Protective apron
- Plastic-covered work surface
- Wire rack or suitable dyeing surface
- Plastic bag or covered container for batching
- Water and paper towels
Step 1: Prepare Your T-Shirt
Wash the shirt first to remove manufacturing residues, finishes or oils that could interfere with even dye penetration. Avoid fabric softener. Prepare the shirt according to the instructions supplied with your fiber-reactive dye system. If your process calls for a soda-ash presoak, use it according to the manufacturer’s directions. Wring or spin out excess liquid so the shirt is damp rather than dripping wet.
Steps 2–7: Find the Center, Fold and Tie
Lay the shirt flat and choose the point where you want the mandala to begin. For a traditional centered design, use a point near the middle of the chest. Pinch a small amount of fabric at that center point and lift upward, then begin accordion-folding outward from the center.
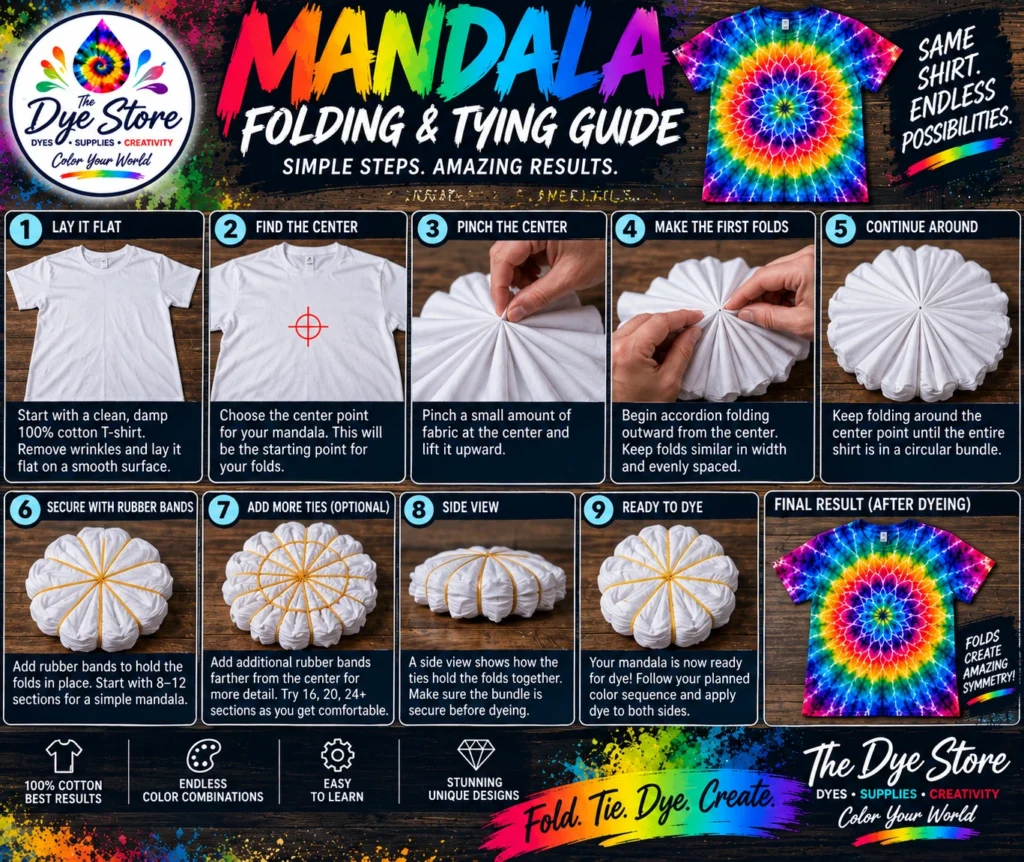
Keep the folds similar in width and evenly spaced as you work around the center. Once the entire shirt forms a compact circular bundle, secure it with rubber bands or string. Start with roughly 8–12 sections for a simpler mandala, or add more sections for greater detail. Additional ties farther from the center can create even more repeating boundaries and pattern complexity.
Step 8: Plan Your Colors
Decide your color order before you start applying dye. A rainbow sequence such as Red → Orange → Yellow → Green → Blue → Purple works well, but limited palettes and alternating contrasts can be just as effective. Planning first helps reduce accidental muddy areas and makes symmetry easier to maintain.
Step 9: Prepare Your Textile Reactive Dyes
Put on appropriate PPE before handling dye powders or concentrated solutions. Prepare each dye according to the manufacturer’s directions. When working with powders, minimize airborne dust, use good ventilation and use appropriate respiratory protection when called for by the product instructions, SDS or working conditions.
Steps 10–11: Apply Dye to the Top and Flip
Place the tied bundle on a protected work surface or rack. Apply dye section by section, beginning near the center. Work carefully enough to get dye into the folds without unnecessarily flooding the entire bundle. Once the first side is complete, flip the shirt and repeat the sequence on the back. For strong symmetry, place corresponding colors opposite the colors used on the first side.
Step 12: Let the Dye React
Place the dyed shirt in a suitable covered container or otherwise batch it according to the instructions for your particular fiber-reactive dye system. Temperature, dye chemistry, moisture and time all matter, so follow the manufacturer’s directions rather than assuming one universal batching period.
Steps 13–15: Rinse, Wash and Reveal
After the recommended reaction period, carefully remove the ties and slowly unfold the shirt. Follow the dye manufacturer’s recommended rinse and wash procedure, continuing until excess color has been appropriately removed. Wash newly dyed garments separately from other clothing during initial washes when appropriate.
How to Get a More Detailed Mandala
More folds create more opportunities for detail. Smaller, carefully controlled folds can produce intricate repeating shapes. Additional ties can introduce more boundaries, while careful color repetition can strengthen the visual symmetry. Once you understand the basic technique, try moving the center, changing section counts and experimenting with different color palettes.
Common Mandala Tie-Dye Problems
- The pattern isn’t symmetrical: the folds or sections were probably uneven.
- Large white areas: dye may not have penetrated deeply enough into the folded bundle.
- Muddy colors: too much dye may have crossed between neighboring sections, or adjacent colors may have mixed.
- The center is off: the initial pinch point determines the center of the finished design.
- Colors aren’t vibrant: check fabric composition, dye preparation, soda-ash requirements and batching conditions.
Pro Tip: Cotton Matters
Fiber-reactive dyes are particularly well suited to cellulose fibers such as cotton. That’s why we recommend a quality 100% ringspun cotton T-shirt for this project. Ringspun cotton also provides a soft, comfortable garment that makes an excellent canvas for detailed tie-dye work.
Same shirt. Endless possibilities.
Shop the Supplies for This Tutorial
Continue Learning
Important Safety Note
Always read and follow the manufacturer’s instructions, product label and applicable Safety Data Sheet for the dyes and auxiliary chemicals you’re using. Work in an appropriately ventilated area and use protective equipment appropriate for the material and task.
Dye powders and related chemical products are not for human or animal consumption.
Dye Safe: A Guide to PPE for Dyeing
Dyeing fabric is creative, colorful and sometimes wonderfully messy. Whether you’re working with natural dyes, fiber-reactive dyes, mordants or an ice-dye project, good preparation isn’t only about getting better color—it also means creating a safer workspace.
Personal protective equipment (PPE) provides a practical layer of protection between you and the materials you’re handling. Gloves, protective eyewear, an apron and task-appropriate respiratory protection can help reduce unnecessary contact with dye powders, splashes and other materials used during dyeing. PPE works best alongside careful handling, good ventilation and the instructions supplied with each product.
Before You Start: Quick Safety Checklist
- Work in a well-ventilated area.
- Cover and organize your work surface.
- Put on gloves and protective eyewear before measuring or mixing.
- Wear an apron or other protective clothing.
- Read the product label and available Safety Data Sheet (SDS).
- Determine whether respiratory protection is appropriate for the material and task.
- Keep food and drinks away from the dyeing workspace.
Why PPE Matters When Dyeing
Many dyeing materials are supplied as powders or concentrated solutions. Fine powders can become airborne while measuring or mixing, liquids can splash, and mordants or other dye auxiliaries can contact skin or eyes. Basic precautions make the process cleaner, safer and easier to manage.
PPE at a Glance
| PPE | Helps protect against | Particularly useful when |
|---|---|---|
| Gloves | Skin contact and staining | Measuring, mixing, applying dye and cleanup |
| Goggles | Splashes and particles | Mixing, pouring and handling powders |
| Apron | Clothing and skin contamination | Most dye projects and cleanup |
| Appropriate respirator | Inhalation of airborne material | When required for the specific material, task or exposure |
Gloves: Protect Your Hands
Your hands are usually closest to the action. Disposable nitrile gloves are useful when measuring dyes, preparing solutions, applying color, handling freshly dyed fabric and cleaning your workspace. Change gloves if they become torn or heavily contaminated, and wash your hands after finishing.
Goggles: Protect Your Eyes
Protective goggles or appropriate safety eyewear are especially useful while mixing powders into liquids, pouring concentrated solutions, preparing mordants or performing tasks that could create splashes or particles. Good eye protection provides a physical barrier when something unexpected happens.
Respiratory Protection and Fine Powders
Powdered dyes deserve special attention. Scooping, pouring or mixing fine powders can put particles into the air. The first line of defense is minimizing dust and providing adequate ventilation: work slowly, avoid pouring powders from unnecessary heights and keep containers closed when they aren’t being used.
Where the product instructions, SDS, workplace conditions or exposure level call for respiratory protection, use a properly selected and properly fitted respirator suitable for the specific material and hazard. Respirators and filters are not interchangeable for every hazard, so follow the manufacturer’s instructions and the SDS.
Powder vs. Prepared Liquid Dye
Handling considerations change after a dye has been dissolved. Fine dry powders present a greater opportunity for airborne particulate exposure during measuring and mixing. Prepared liquid dyes generally reduce that particular concern, but splashes and skin or eye contact can still occur. Gloves and appropriate eye protection remain good practice.
Aprons: Protect Your Skin and Clothing
A waterproof or appropriately protective work apron provides another barrier against spills, splashes and concentrated dye solutions—and makes cleanup easier. Combined with gloves and eye protection, an apron creates a practical everyday dyeing setup.
Ventilation Is Part of the Safety System
PPE should not be the only control. Good ventilation and minimizing airborne powder are important parts of a safer workspace. Avoid creating unnecessary dust, keep the work area organized and use the handling precautions recommended for the particular products you’re using.
What PPE Cannot Do
PPE does not make careless handling safe. It does not replace reading labels and SDSs, proper ventilation, careful measuring, suitable storage or appropriate cleanup. Think of PPE as one layer in a complete set of good work habits.
Natural Dyes Need Good Practices Too
“Natural” does not automatically mean a material should be handled without precautions. Plants contain naturally occurring compounds, and natural-dye processes may also involve mordants, modifiers or other ingredients. The exact precautions depend on the material and process. Understanding what you’re handling matters more than assuming something is harmless because of its source.
Make Safety Part of the Creative Process
Once gloves, goggles, an apron and any task-appropriate respiratory protection become part of your normal setup, using them becomes as routine as preparing fabric or mixing colors. Set up your workspace, put on the appropriate protection, prepare your dyes carefully and then concentrate on creating something great.
Safety today. More creativity tomorrow.
Shop the Supplies for This Tutorial
Continue Learning
Important Safety Note
Always read and follow the product label, manufacturer’s instructions and applicable Safety Data Sheet before handling dyes, mordants or related materials. PPE requirements vary with the material, concentration, application and working conditions. Use appropriate ventilation and protective equipment for the materials you’re handling.
Dye powders and related chemical products are not for human or animal consumption.
Natural Dyes vs. Textile Reactive Dyes: Earthy Beauty vs. Vibrant Color
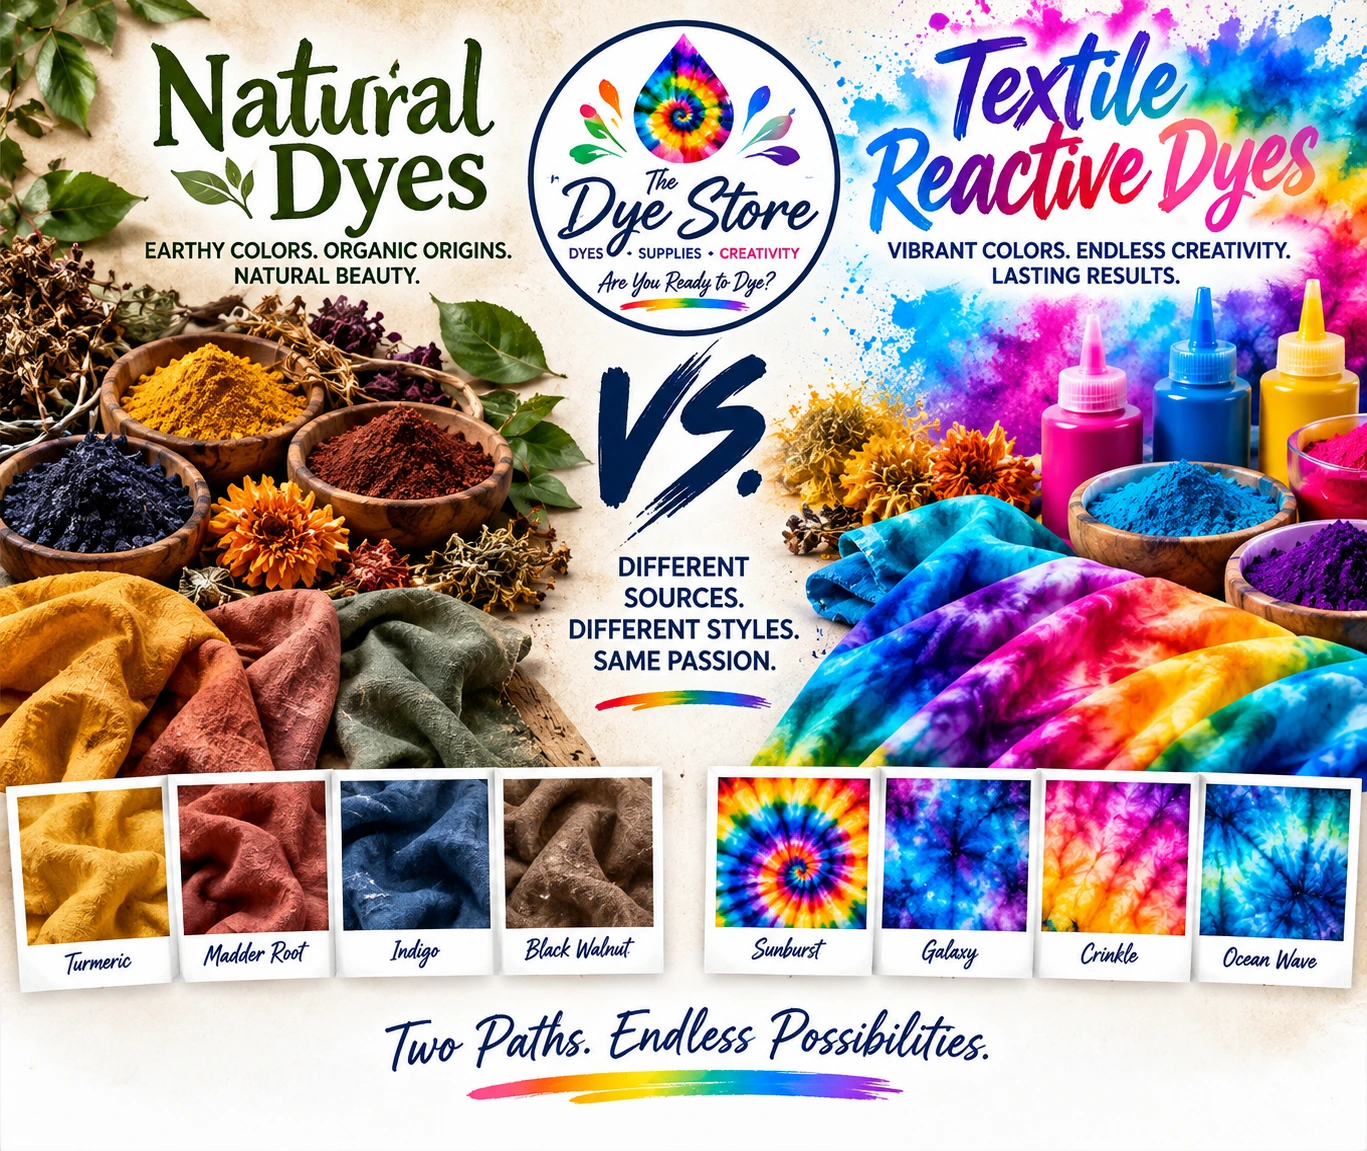
Color can tell a completely different story depending on the dye you choose. Natural dyes are known for earthy, organic-looking shades and beautiful variation, while textile reactive dyes are known for bold, vibrant color and a huge range of creative possibilities.
Neither approach has to replace the other. They create different aesthetics, use different processes, and each brings its own character to textile work. Here is a simple comparison to help you decide which direction fits your next project.
Natural Dyes: Earthy, Organic Color
Natural dyes are derived from plant and other naturally occurring dye sources. Materials such as turmeric, madder root, black walnut and indigo can produce colors that feel connected to nature: warm golds, rusts, browns, muted greens, reds and distinctive blues.
Part of their appeal is natural variation. The exact shade can change with the fiber, dye concentration, water chemistry, mordant or fixative, temperature and process. That variability can give naturally dyed fabric an individual, handcrafted appearance that is difficult to duplicate exactly.
What makes natural dyes unique?
- Earthy and nature-inspired color palettes
- Beautiful tonal variation from project to project
- A connection to traditional textile-dyeing methods
- Excellent for makers who enjoy experimentation and process
- Distinctive results that can feel organic and one-of-a-kind
Textile Reactive Dyes: Bright, Vibrant Color
Textile reactive dyes—often called fiber-reactive dyes—take color in a very different direction. They are especially popular for cellulose fibers such as cotton because they can produce brilliant, saturated colors and, when used correctly, form strong chemical bonds with the fiber.
This is the world of electric blues, vivid pinks, intense purples, brilliant oranges and high-impact color combinations. They are a natural choice for tie-dye, ice-dye and other projects where bright color and creative effects are the goal.
What makes textile reactive dyes unique?
- Bright, saturated and vibrant colors
- A broad range of shades and color combinations
- Excellent potential for tie-dye and ice-dye effects
- Strong affinity for compatible cellulose fibers when properly processed
- Great for bold patterns, gradients, color splitting and experimentation
Earthy vs. Vibrant: Two Different Color Stories
The easiest way to understand the difference is through the finished look. Natural dyes often create a softer, grounded palette that feels botanical, traditional and organic. Textile reactive dyes generally deliver stronger saturation and a more vivid, contemporary appearance.
That difference is exactly why both belong in a creative dye studio. A naturally dyed madder or black-walnut piece can have a subtle character all its own, while a fiber-reactive tie-dye shirt can explode with brilliant color. Different sources. Different styles. Same creativity.
Which Type of Dye Should You Choose?
Choose natural dyes when you are drawn to earthy tones, traditional processes and natural variation. Choose textile reactive dyes when your project calls for vivid color, high-impact patterns or techniques such as tie-dye and ice-dye.
There is also no reason to limit your creativity to one category. Learning both gives you a much wider color vocabulary and helps you understand how different dye systems interact with textiles.
Shop the Supplies for This Tutorial
Explore the dye styles and supplies discussed above.
Two paths. Endless possibilities.
Dye powders and related chemical products are not for human or animal consumption. Follow product instructions and appropriate handling precautions.
Dye Under Ice vs. Dye Over Ice: What’s the Difference?
Ice dyeing is one of the most creative ways to use fiber-reactive dyes. Instead of mixing the dye into liquid first, melting ice slowly carries powdered dye through the fabric, creating organic patterns, gradients and dramatic color splits.
One of the biggest choices is surprisingly simple: do you put the dye powder under the ice or on top of it? Both methods work, but they can produce noticeably different results.
Dye Under Ice (DUI)
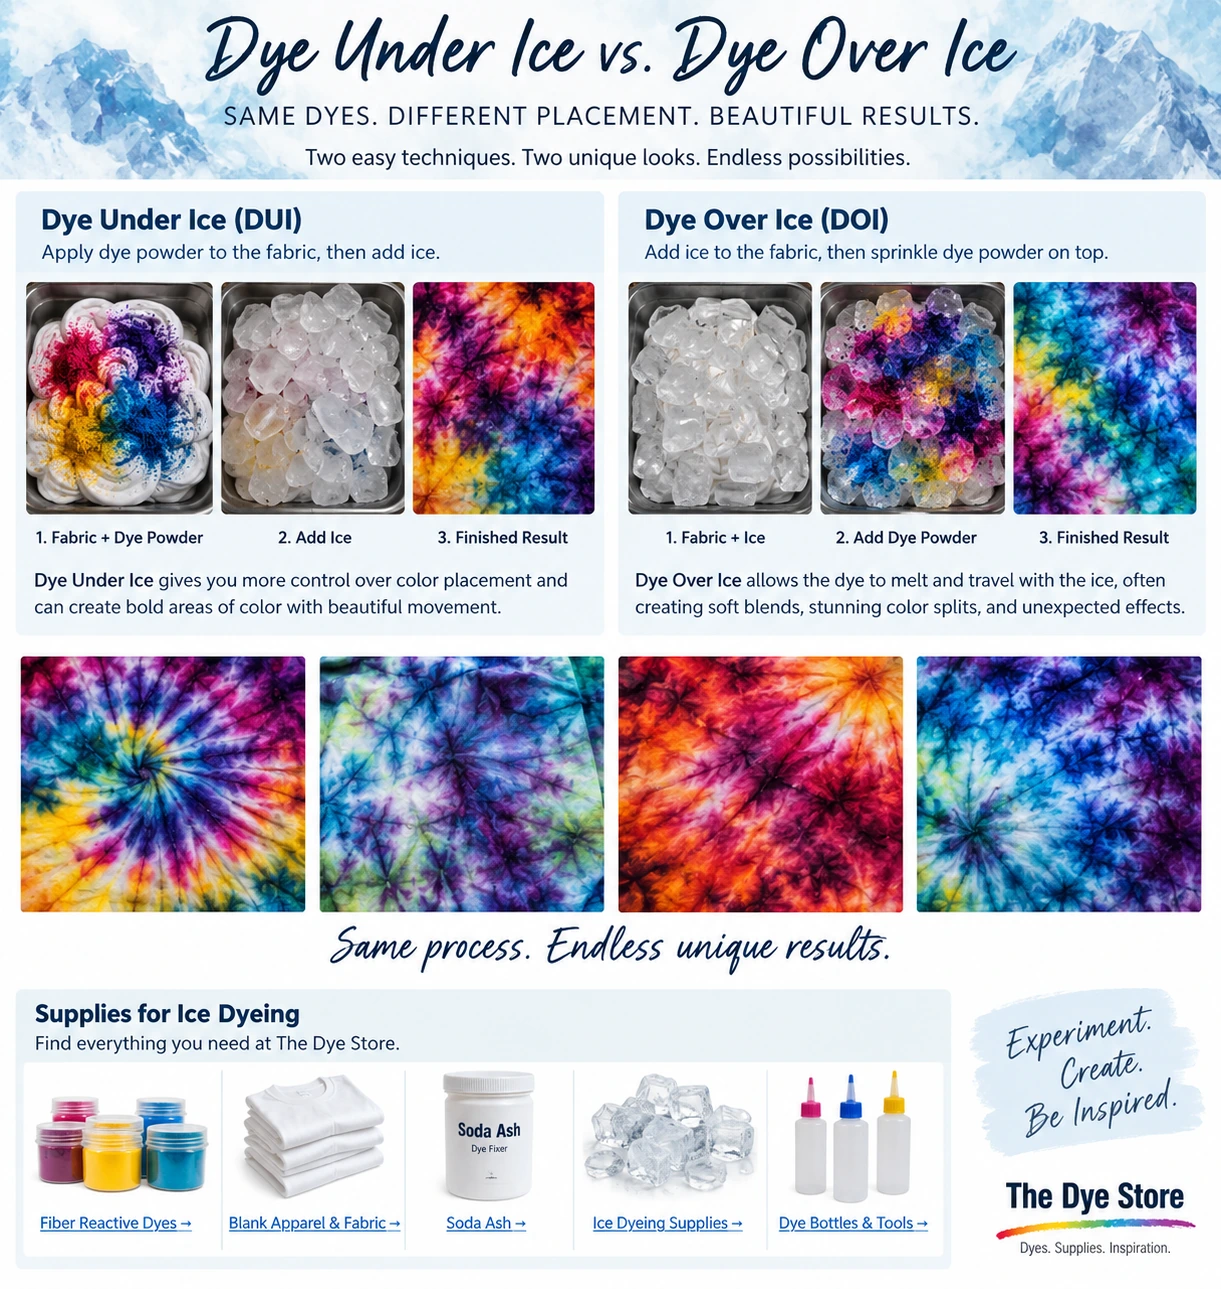
With Dye Under Ice, fiber-reactive dye powder is applied directly to prepared fabric before the ice is added: Fabric → Dye Powder → Ice.
Because the powder starts directly against the fabric, DUI gives you more control over where individual colors begin. As the ice melts, water activates the dye and carries it through the folds. This method is useful when you want deliberate color placement and concentrated areas of color while still getting the movement that makes ice dyeing unique.
Dye Over Ice (DOI)
With Dye Over Ice, the order is reversed: Fabric → Ice → Dye Powder.
The powder is sprinkled across the ice and dissolves as the ice melts. That extra travel can create beautiful blending, fine veins and unexpected color separation. Blended fiber-reactive colors can be especially interesting because their individual dye components may move differently, revealing surprising secondary colors. This effect is often called color splitting.
Ice Dyeing Tip: Blended fiber-reactive dyes can separate into their component colors as melting ice carries them through the fabric. This color splitting can reveal unexpected shades, so a dye that looks like one color in powder form may produce several tones in the finished design.
DUI vs. DOI: Which Should You Try?
Choose Dye Under Ice when you want more control over initial color placement. Choose Dye Over Ice when you want the melting ice to have more influence over movement, blending and color splitting.
For a simple experiment, use the same colors on two similar pieces of white cotton and try one method on each. You can also combine the techniques by putting selected colors beneath the ice and others on top.
Shop the Supplies for This Tutorial
Ready to try ice dyeing? Use these direct links to shop the core supplies used in this tutorial.
Experiment With Your Colors
One of the best things about ice dyeing is that the finished piece isn’t completely predictable. Change the dye placement, amount of ice, fabric folds or color combination and you can get an entirely different result.
Explore The Dye Store’s Fiber-Reactive Dye Collection and experiment with Dye Under Ice, Dye Over Ice, or a combination of both.
Experiment. Create. Be inspired.
Dye powders and related chemical products are not for human or animal consumption. Follow product instructions and appropriate handling precautions.