5 Tie-Dye Techniques: Step-by-Step Folding, Dyeing and Unfolding
Learn five tie-dye techniques on a cotton T-shirt: spiral, bullseye, crumple, accordion stripes and a folded heart. Follow the folding, binding, dye placement and unfolding directions below. Start with crumple for the easiest first project, then try spiral and bullseye before the heart.
Supplies
- Dye-ready 100% cotton T-shirt
- DIY Tie-Dye Kit or cotton-compatible fiber-reactive dyes, bottles and rubber bands. Check the kit contents before buying extras.
- Soda ash if required by your dye process. Do not add extra activator to a premixed kit unless its instructions require it.
- Nitrile gloves, chemical splash goggles and waterproof apron
- Dedicated rack and catch tray, washable surface covering, plastic bags or covered containers, detergent, and a washable fabric marker for the heart.
Prepare your shirt and work area
- Read your dye label and safety data sheet before opening powder. Use the respiratory protection specified there, keep powder away from drafts, and keep children, pets, food and utensils away from the mixing area. See our dyeing PPE guide.
- Prewash the shirt with detergent without fabric softener. Check the fiber label: polyester-rich blends will not behave like 100% cotton with this process.
- If your dye calls for a soda-ash presoak, prepare and use it at the label concentration and soak time while wearing appropriate protection. Squeeze out excess liquid with gloved hands. Otherwise follow your kit’s preparation instructions.
- Begin with fabric evenly damp but not dripping. Smooth the two layers together. Measure dye powder and water using your product instructions; no universal spoon recipe suits every dye strength.
- Mix only what the product directions recommend for your project. Label bottles and keep them upright. These are direct-application fiber-reactive dye methods; natural dyes require a different process.
Timing: Allow approximately 15–30 minutes for folding and dye placement, plus product-specific preparation, curing, rinsing, washing and drying. Do not treat folding time as the total project time.
Classic spiral
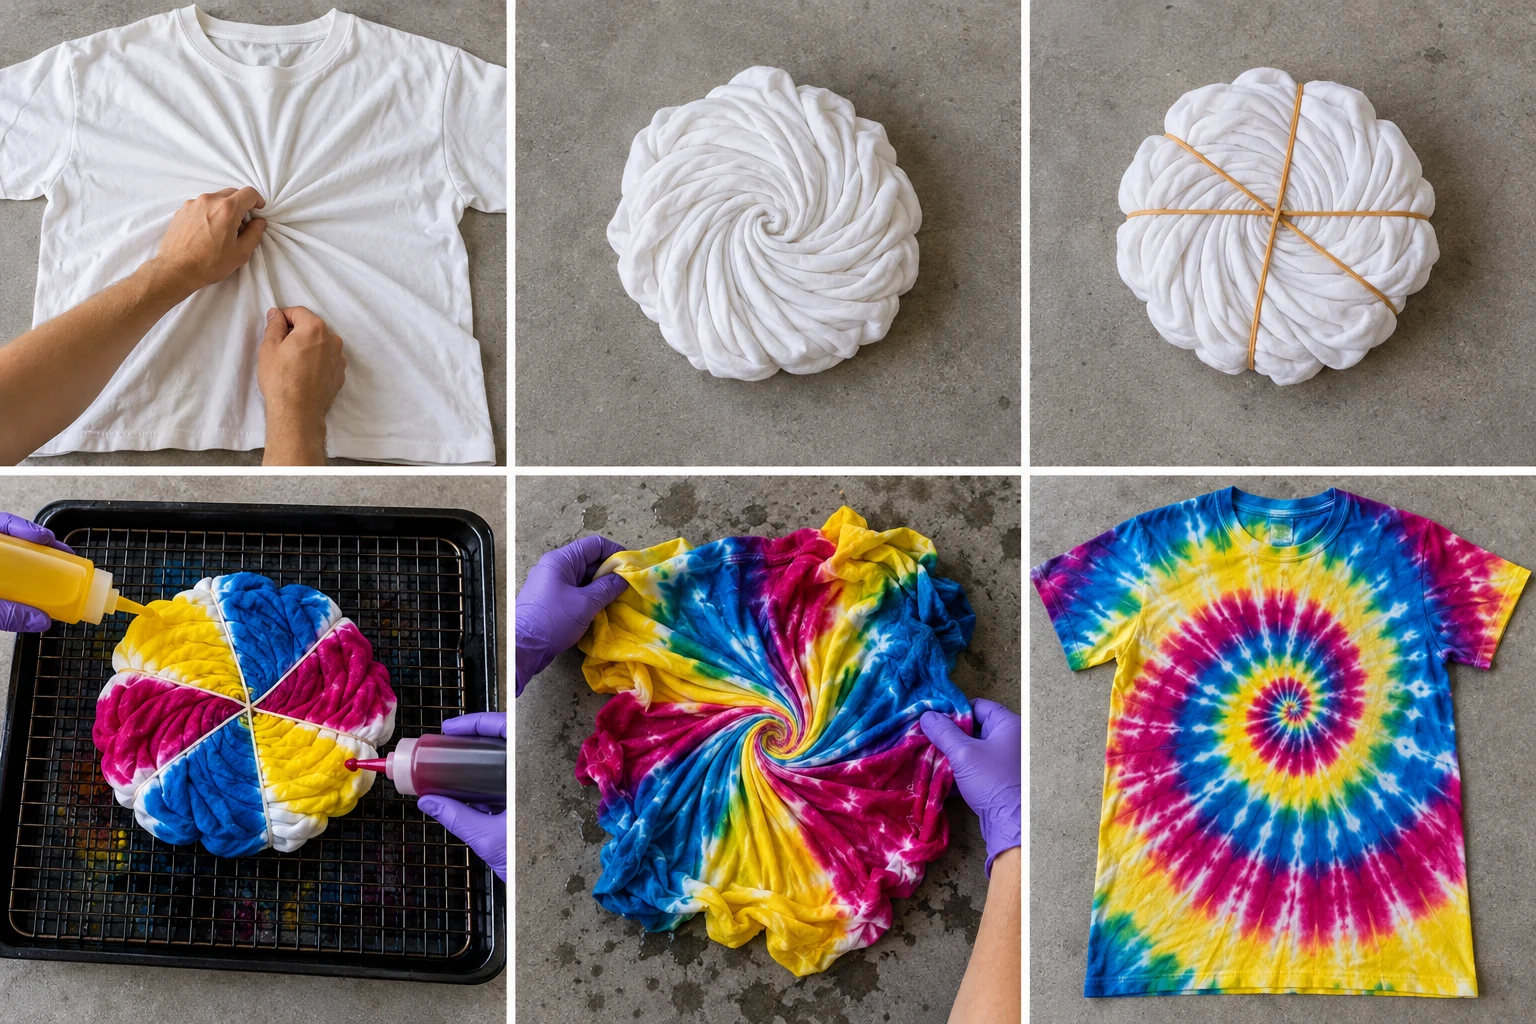
- Spread the damp cotton shirt flat, smoothing the front and back together. Pinch the point where you want the swirl to begin.
- Turn the pinch slowly while guiding the surrounding fabric into low, even pleats. Keep the developing disk flat; tuck the sleeves around its edge.
- Cross three rubber bands through the center to make six wedges. They should hold the disk without crushing it into a ball.
- On a rack above a catch tray, apply small amounts of yellow, fuchsia and blue to separate wedges. Keep complementary colors apart where you want cleaner blends.
- Flip the disk and repeat the corresponding color placement underneath. Gently separate a few pleats with gloved fingers to reach white interiors without flooding the tray.
- Complete the curing and initial rinse below before removing bands. Lift the disk gently by its outside edges and open the pleats outward. Rinse the opened shirt, wash and dry before judging the final swirl.
Tip: If the center piles upward, unwind slightly and flatten the pleats before continuing.
Suggested palette: Lemon Yellow dye, Fuchsia dye, Cobalt Blue dye. These links identify suggested colors, not a guarantee of exact illustrated shades.
Bullseye rings
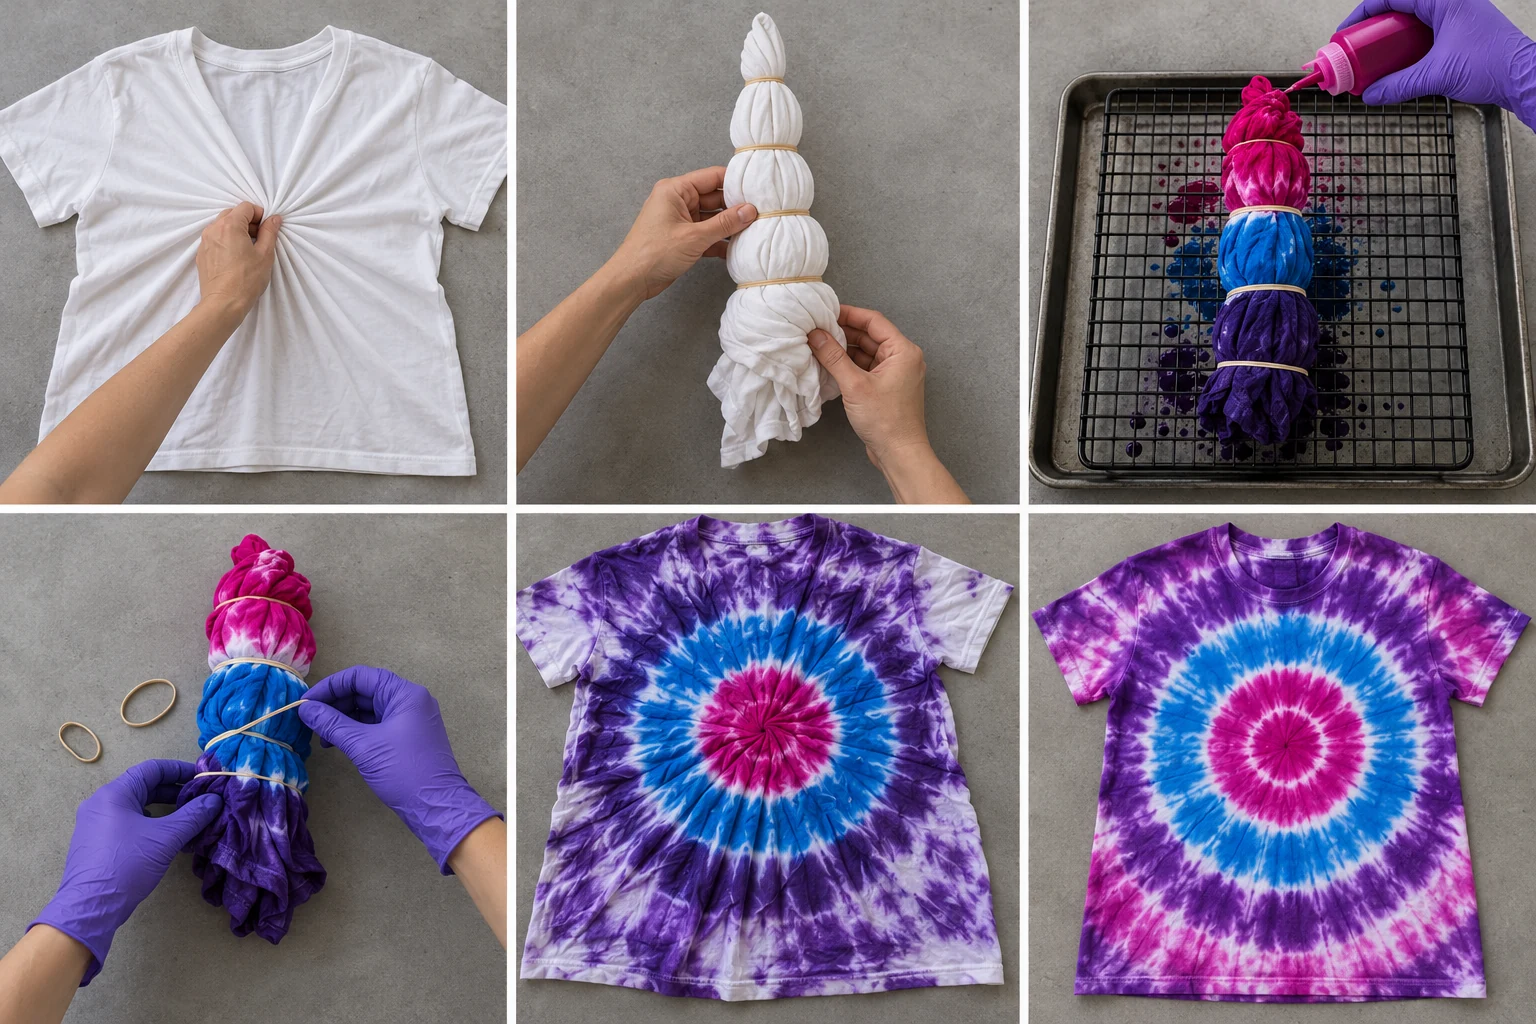
- Lay the damp shirt flat with both layers aligned. Choose a center on the chest, side or lower front.
- Pinch both layers at that point and lift them into a long cone. Let the remaining fabric hang together.
- Place the first band 2–3 inches from the tip. Add bands every 2–3 inches along the cone; these measurements are starting points, not requirements.
- Apply fuchsia to the tip, blue to the next section and purple farther down. Rotate the cone and apply dye around every side.
- Keep the bound shirt damp and follow the product curing instructions, then begin rinsing while it remains tied.
- Remove the bands after the initial rinse. Pull the gathered fabric gently away from the original pinch point in all directions. Spread the shirt open, continue rinsing, then wash and dry.
Tip: Wide spaces between bands create broad rings; close spacing produces narrower rings.
Suggested palette: Fuchsia dye, Cobalt Blue dye, Deep Purple dye. These links identify suggested colors, not a guarantee of exact illustrated shades.
Easy crumple
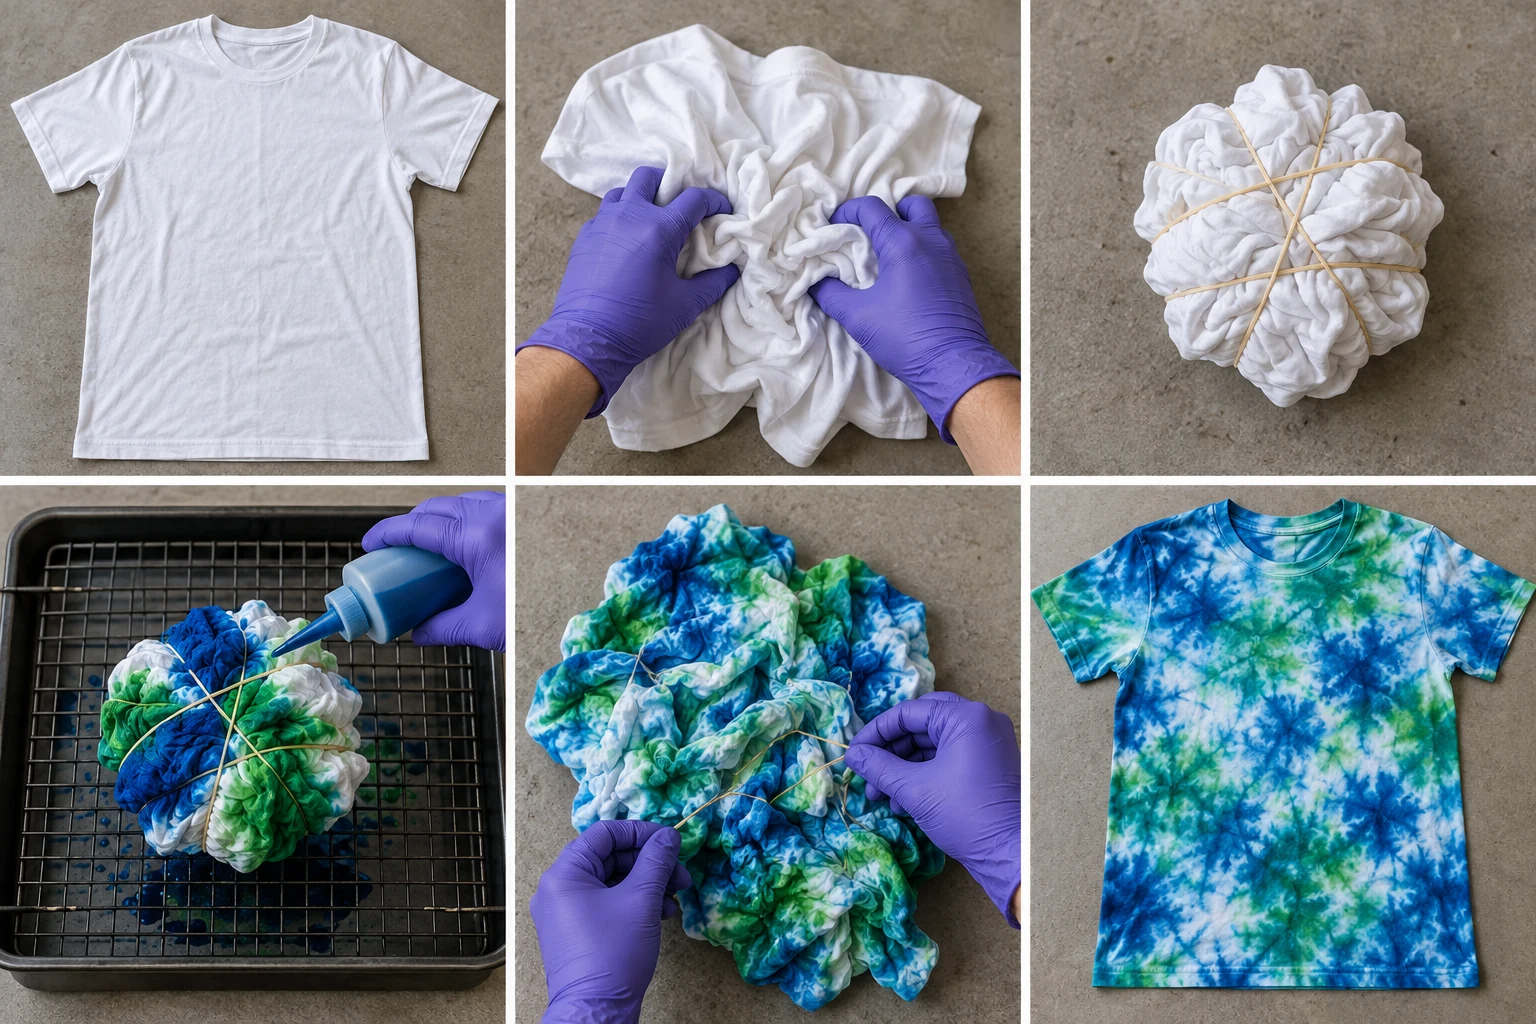
- Spread the damp shirt on your protected work surface. Smooth large accidental folds before you start.
- Use your fingertips to push small sections inward, creating irregular wrinkles across the entire shirt.
- Gather it into a low mound and add a few loose rubber bands. Preserve the small wrinkles rather than rolling the shirt into a tight ball.
- Apply blue and green in scattered patches on a rack above a tray. Leave some areas white for contrast.
- Turn the bundle carefully and repeat on the back, avoiding a puddle of mixed dye beneath it.
- After curing and the initial rinse, remove the ties. Ease the wrinkles apart from the edges toward the middle. Rinse fully opened, wash and dry to reveal the mottled pattern.
Tip: For more white contrast, use a tighter scrunch and less dye; for fuller coverage, loosen the wrinkles and check beneath them.
Suggested palette: Cobalt Blue dye, Bright Green dye. These links identify suggested colors, not a guarantee of exact illustrated shades.
Accordion stripes
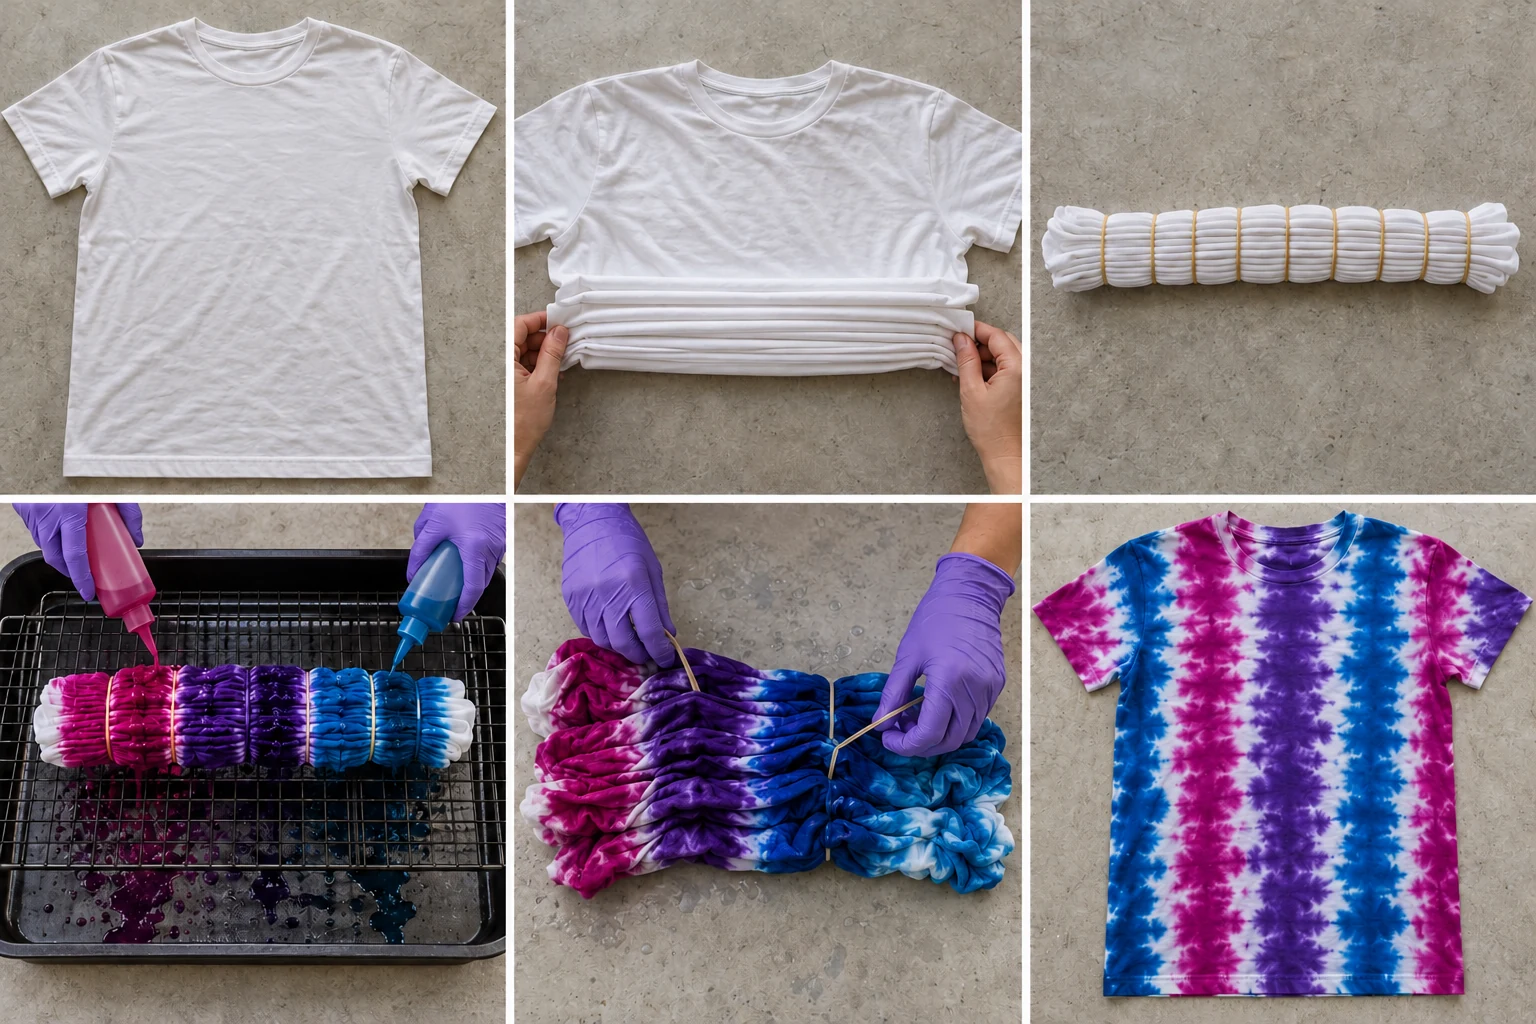
- Lay the damp shirt flat. To create vertical stripes, start at the bottom hem and work toward the shoulders.
- Fold a strip about 1–2 inches deep upward, then fold the same width back under. Continue alternating until the shirt forms a narrow strip running left to right.
- Bind that strip at intervals along its length. The positions of these ties divide the eventual left-to-right color sections.
- Apply fuchsia, purple and blue between the ties. Rotate the bundle and carefully reach the folded edges for more even coverage.
- Keep the bundle damp while curing according to the dye instructions. Begin rinsing before removing the bands.
- Remove ties and unfold the accordion one pleat at a time from shoulders toward hem. Spread flat, rinse, wash and dry. For horizontal stripes next time, accordion-fold from one side seam toward the other instead.
Tip: Keep fold widths consistent. The direction of the pleats and the direction of the final colored stripes are different.
Suggested palette: Fuchsia dye, Deep Purple dye, Cobalt Blue dye. These links identify suggested colors, not a guarantee of exact illustrated shades.
Folded heart
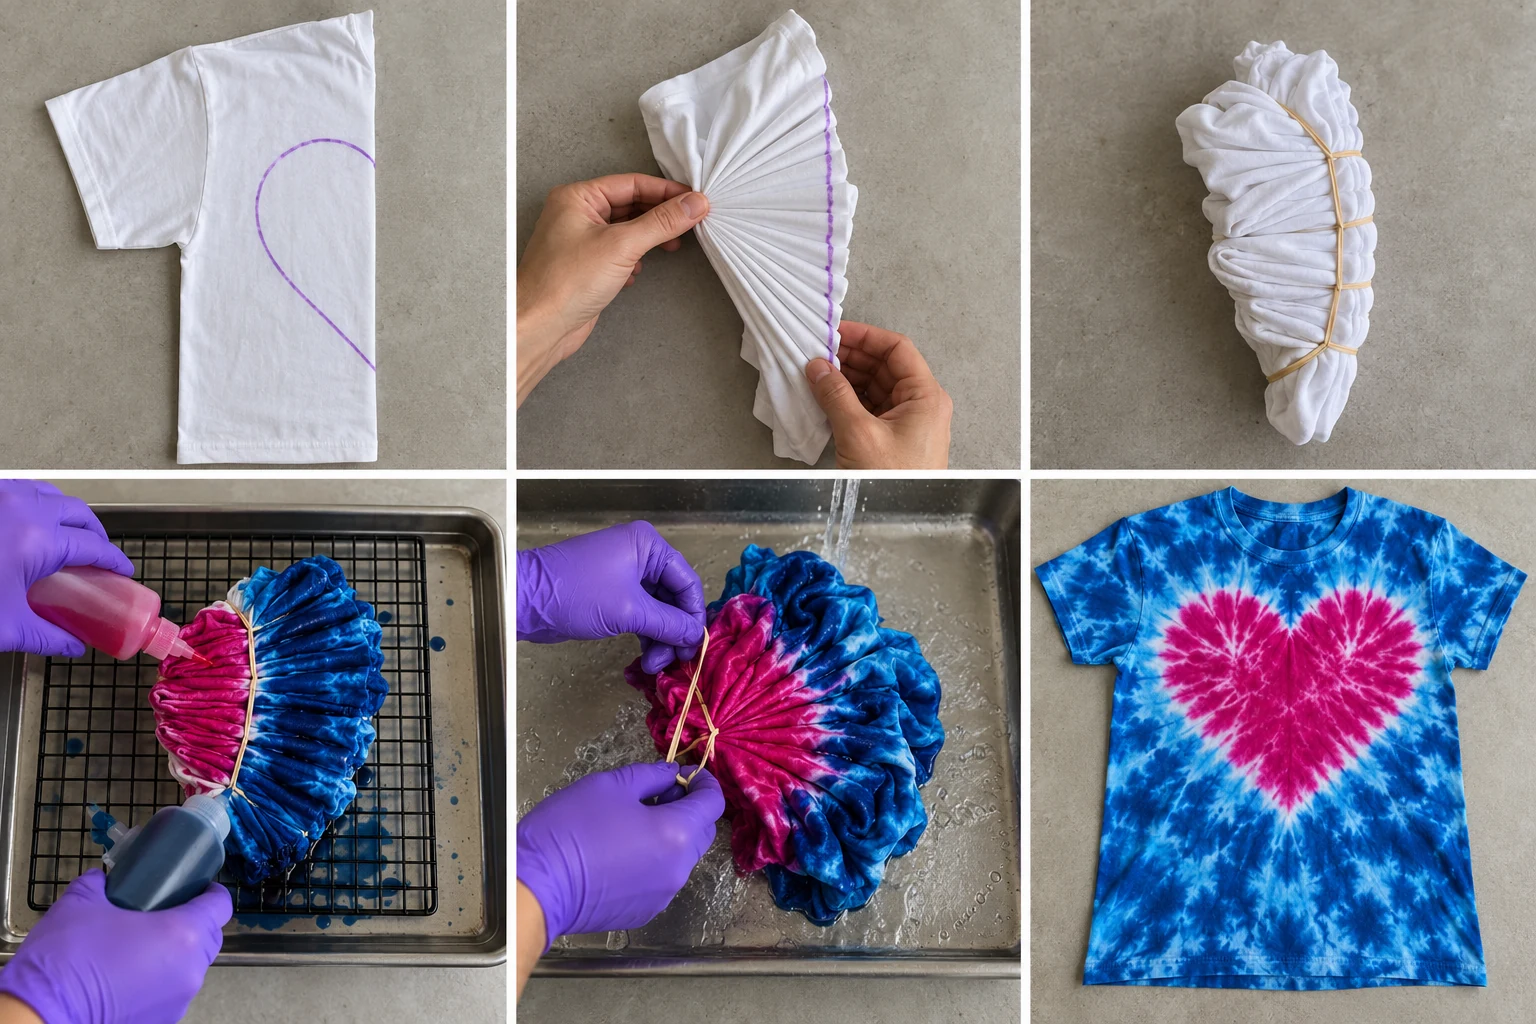
- Fold the damp shirt vertically in half, matching shoulders, sleeves and side seams. The center front becomes the folded edge.
- Draw half a heart with a washable fabric marker, with its top indentation and bottom point touching that folded edge. Make it broad and simple for your first attempt.
- Beginning at one end of the curve, make small accordion pleats. Adjust the pleat angles so successive parts of the curved guideline line up in one straight stack.
- Bind firmly along the aligned marked line. The fabric between the center fold and this tie forms the heart; the remaining fabric forms the background.
- Apply fuchsia inside the heart section and blue outside it, checking both faces. A second tie outside the first can reserve a narrow border.
- After curing and the initial rinse, remove the ties. Open the tiny pleats first, then unfold the shirt along its original center fold. Continue rinsing, wash and dry. Expect a soft-edged heart rather than a printed outline.
Tip: If your guideline does not stack into a straight line, redo the pleats before adding dye.
Suggested palette: Fuchsia dye, Cobalt Blue dye. These links identify suggested colors, not a guarantee of exact illustrated shades.
Cure, rinse, unfold and wash
- Cure while tied: Place each bundle in its own bag or covered container to retain moisture. Use the exact curing time and temperature on the dye instructions. Do not let the fabric dry prematurely.
- Begin rinsing: Wear gloves. Start with cool water, or the rinse sequence specified by your dye manufacturer, while the shirt remains tied. Remove loose surface dye without letting it pool onto undyed fabric.
- Remove the bands: Slide them off carefully after the initial rinse. If a band must be cut, lift it clear of the fabric first and keep scissors away from the shirt.
- Unfold slowly: Follow the technique-specific directions above. Separate one fold at a time under running water, then rinse both faces. Do not twist or yank a tightly gathered area.
- Wash: Use detergent and the dye manufacturer’s washout temperature, within the garment’s care limits. Complete the recommended washout rather than relying only on rinse-water clarity. Do not substitute vinegar for the required fiber-reactive dye process.
- Dry and inspect: Follow the garment care label. Keep the first washes separate from other clothing. Evaluate the dry shirt: wet colors appear darker.
Troubleshooting
- Too much white: The folds may have been too tight or the dye may not have reached inside. Next time, gently check the pleats on both faces while applying dye.
- Muddy colors: Too much liquid or mixed runoff can blur colors. Use a raised rack and smaller applications; place neighboring colors together.
- Weak color: Check fiber content, washing preparation, dye freshness, activator requirements and curing temperature/time against your product instructions.
- Pattern lost its shape: Keep pleats controlled and bands snug enough to hold them. Photograph the tied bundle and dye layout so you can adjust the next attempt.
Keep learning
Explore the dedicated spiral guide, bullseye guide and accordion stripe guide, or return to The Dye Store Learn Hub.
Technical reference: Jacquard’s Procion MX manufacturer information explains cellulose-fiber compatibility and soda-ash fixation for that product family. Always use your own dye’s instructions for quantities, timing and temperatures; this reference does not identify the brand or formula of The Dye Store dyes.
Images are AI-generated photorealistic educational illustrations. Patterns and colors are approximate; actual results vary with fabric, folds, dye and processing.